Firebase - Auth 공식문서
참고로, 해당 글은 Firebase V9 버전을 바탕으로 작성된 글이다.
Firebase V8 이하 버전은 import 등의 방식이 다르므로 공식 문서를 꼭 참고하길 바란다.
- React 환경에서 작성되었습니다.
- Firebase 시작하기 포스팅으로 초기 세팅을 한 후 보는 것을 추천드립니다.
절대 경로 설정
CRA 공식 문서에 따르면 절대경로 설정을 위해 최상위 경로에 jsconfig.json 파일을 생성하여 설정할 수 있다.
{
  "compilerOptions": {
    "baseUrl": "src"
  },
  "include": ["src"]
}
절대 경로를 설정하면 컴포넌트를 import할 때 ../, ./ 등과 같은 상대경로 대신 다음과 같이 좀 더 보기 좋게 작성할 수 있다.
import Button from 'components/Button';Firebase 인증 초기화
getAuth 모듈을 import해 Firebase 인증을 초기화한다.
Firebase 의 버전에 따라 import 방식이 다르며, 해당 문서는 V9 버전을 기준으로 작성되었다.
import { initializeApp } from 'firebase/app';
import { getAuth } from 'firebase/auth';

const firebaseConfig = {
  ...
};

initializeApp(firebaseConfig);
export const authService = getAuth();
인증 초기화를 완료했다면 정상적으로 작동하는지 확인하기위해 App.js 에서 import 하여 로그를 출력해보자.
// Absoulte import (상대경로)
import { authService } from 'fbase';

function App() {
  console.log(authService); // firebase auth 출력
  return <>...</>;
}

export default App;
정상작동 하는 것을 확인했다.

Firebase 로그인 여부 확인
authService.currentUser 를 통해 현재 로그인된 유저의정보를 확인할 수 있다.
현재 아무것도 작업하지 않았기 때문에 null 이 출력되는 것을 확인할 수 있다.
이제 Firebase 콘솔에서 어떤 방법으로 로그인 할 것인지 설정해야 한다.
import { authService } from 'fbase';

function App() {
  const [isLoggedIn, setIsLoggedIn] = useState(authService.currentUser);
  console.log(isLoggedIn); // null

  return <>...</>;
}

export default App;
Firebase 로그인 방법 설정
- Firebase 콘솔에서 해당 프로젝트에 접속한다.
- 제품 카테고리의 빌드 > Authentication > 시작하기 > User 탭을 클릭한다.
- 로그인 방법 설정(Sign-in-method) 버튼을 클릭한다.
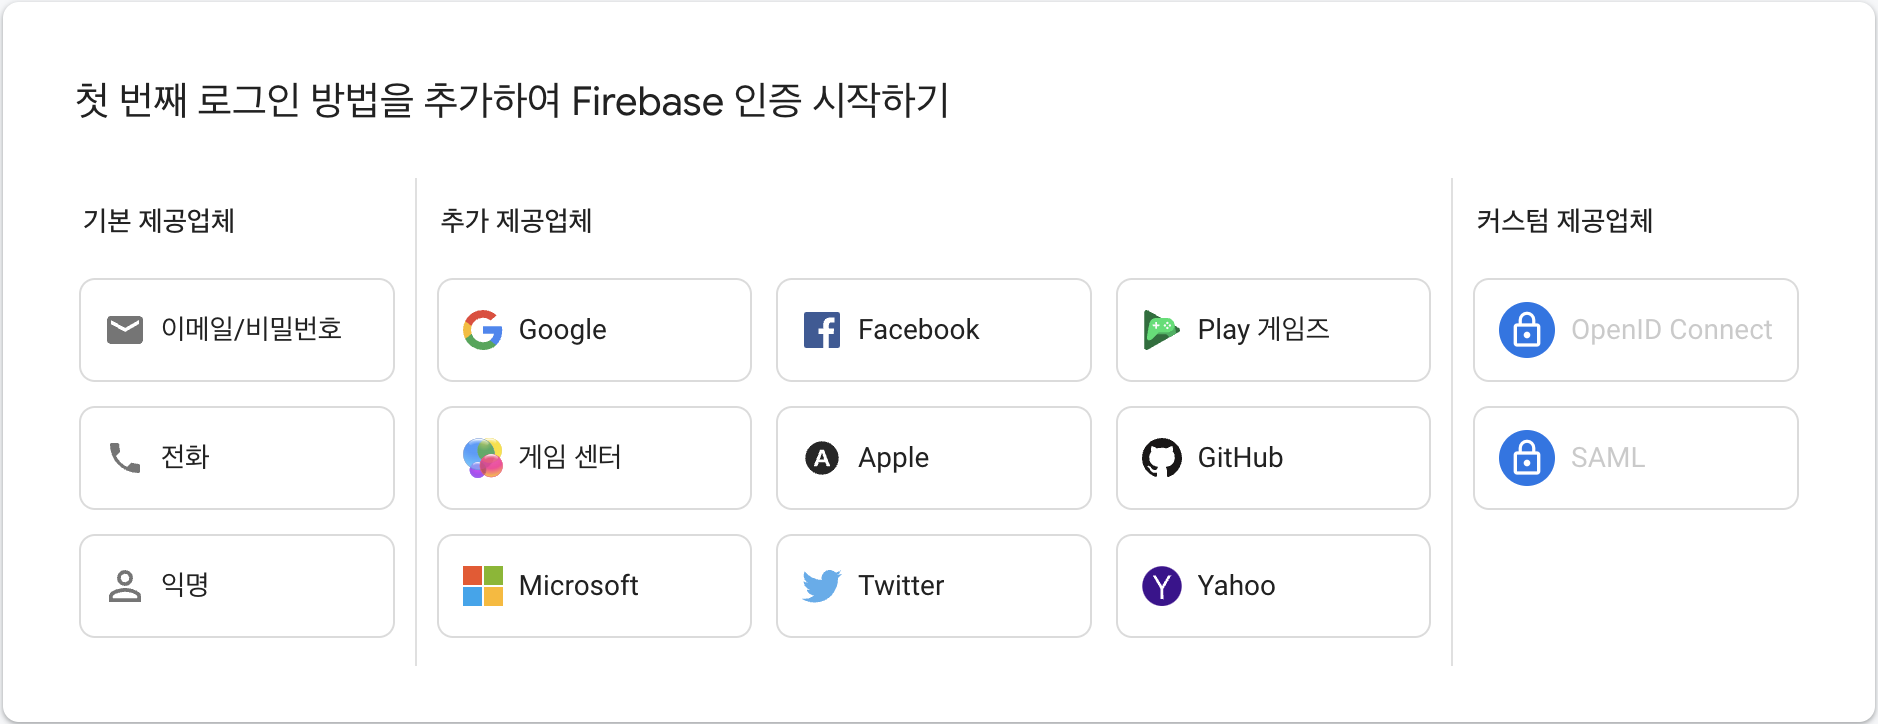
본인의 사용 목적에 맞게 설정한다. 나는 '이메일/비밀번호'와 Google'을 선택했다.
사용 설정을 해주고 저장을 클릭한다. Google 또한 사용 설정 후 저장을 클릭한다.

GitHub 설정하는 법
추가로 깃허브 설정까지 완료했다. 깃허브의 경우 별도의 셋팅이 필요하다.
[GitHub] Setting/Develpoer settings - OAuth Apps로 이동해 New OAuth App을 클릭해 추가한다.
-
Application name 입력
-
Homepage URL 입력
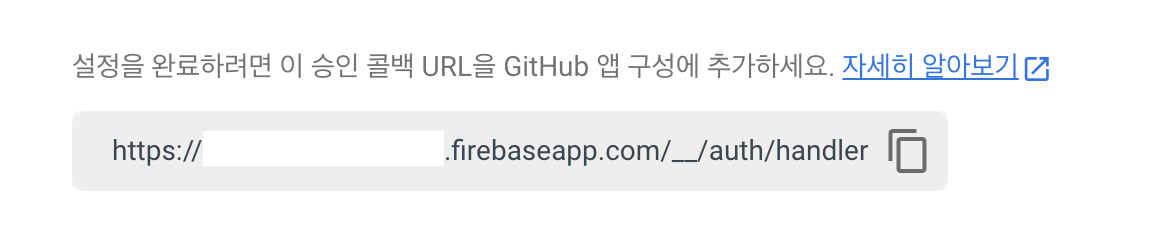
Firebase Github 설정 화면에서 다음 URL의 도메인까지만 복사/붙여넣기 한다. https://~.firebase.com/
-
Application description 입력(선택)
-
Authorization callback URL
2번의 '전체' URL을 복사/붙여넣기 한다.
https://~.firebase.com/__auth/handler -
Register Application 클릭하면 Client ID 와 Client secret 을 발급받는다.
Client secret은
Generate a new client secret버튼을 클릭하면 발급 받을 수 있다. -
발급받은 ID 와 secret 을 GitHub 설정 창에 입력하고 저장한다.
계정 생성과 로그인
공식 문서에 따르면 다음과 같이 계정을 생성할 수 있다. 계정이 생성되면 자동으로 로그인 처리된다.
import { getAuth, signInWithEmailAndPassword } from 'firebase/auth';

const auth = getAuth();
signInWithEmailAndPassword(auth, email, password)
  .then((userCredential) => {
    // Signed in
    const user = userCredential.user;
    // ...
  })
  .catch((error) => {
    const errorCode = error.code;
    const errorMessage = error.message;
  });
우리의 코드에 작성하면 다음과 같이 작성할 수 있다.
- 위에서 작성한 fbase.js 파일에서
getAuth메서드를 import 한다. - 계정 생성을 위한
createUserWithEmailAndPassword메서드를 import 한다. - 계정이 있을 경우 로그인을 위한
signInWithEmailAndPassword메서드를 import 한다.
import { authService } from 'fbase';
import {
createUserWithEmailAndPassword,
signInWithEmailAndPassword,
} from 'firebase/auth';
function Auth() {
const [newAccount, setNewAccount] = useState(false); // 계정 유무애 따라 계정을 생성하거나 로그인
...
const onSubmit = async (evt) => {
evt.preventDefault();
try {
let data;
if (newAccount) { // create account
data = await createUserWithEmailAndPassword(authService, email, password);
else { // log in
data = await signInWithEmailAndPassword(authService, email, password);
}
console.log(data);
} catch (error) {
console.log(error);
}
};
return <>...</>;
}
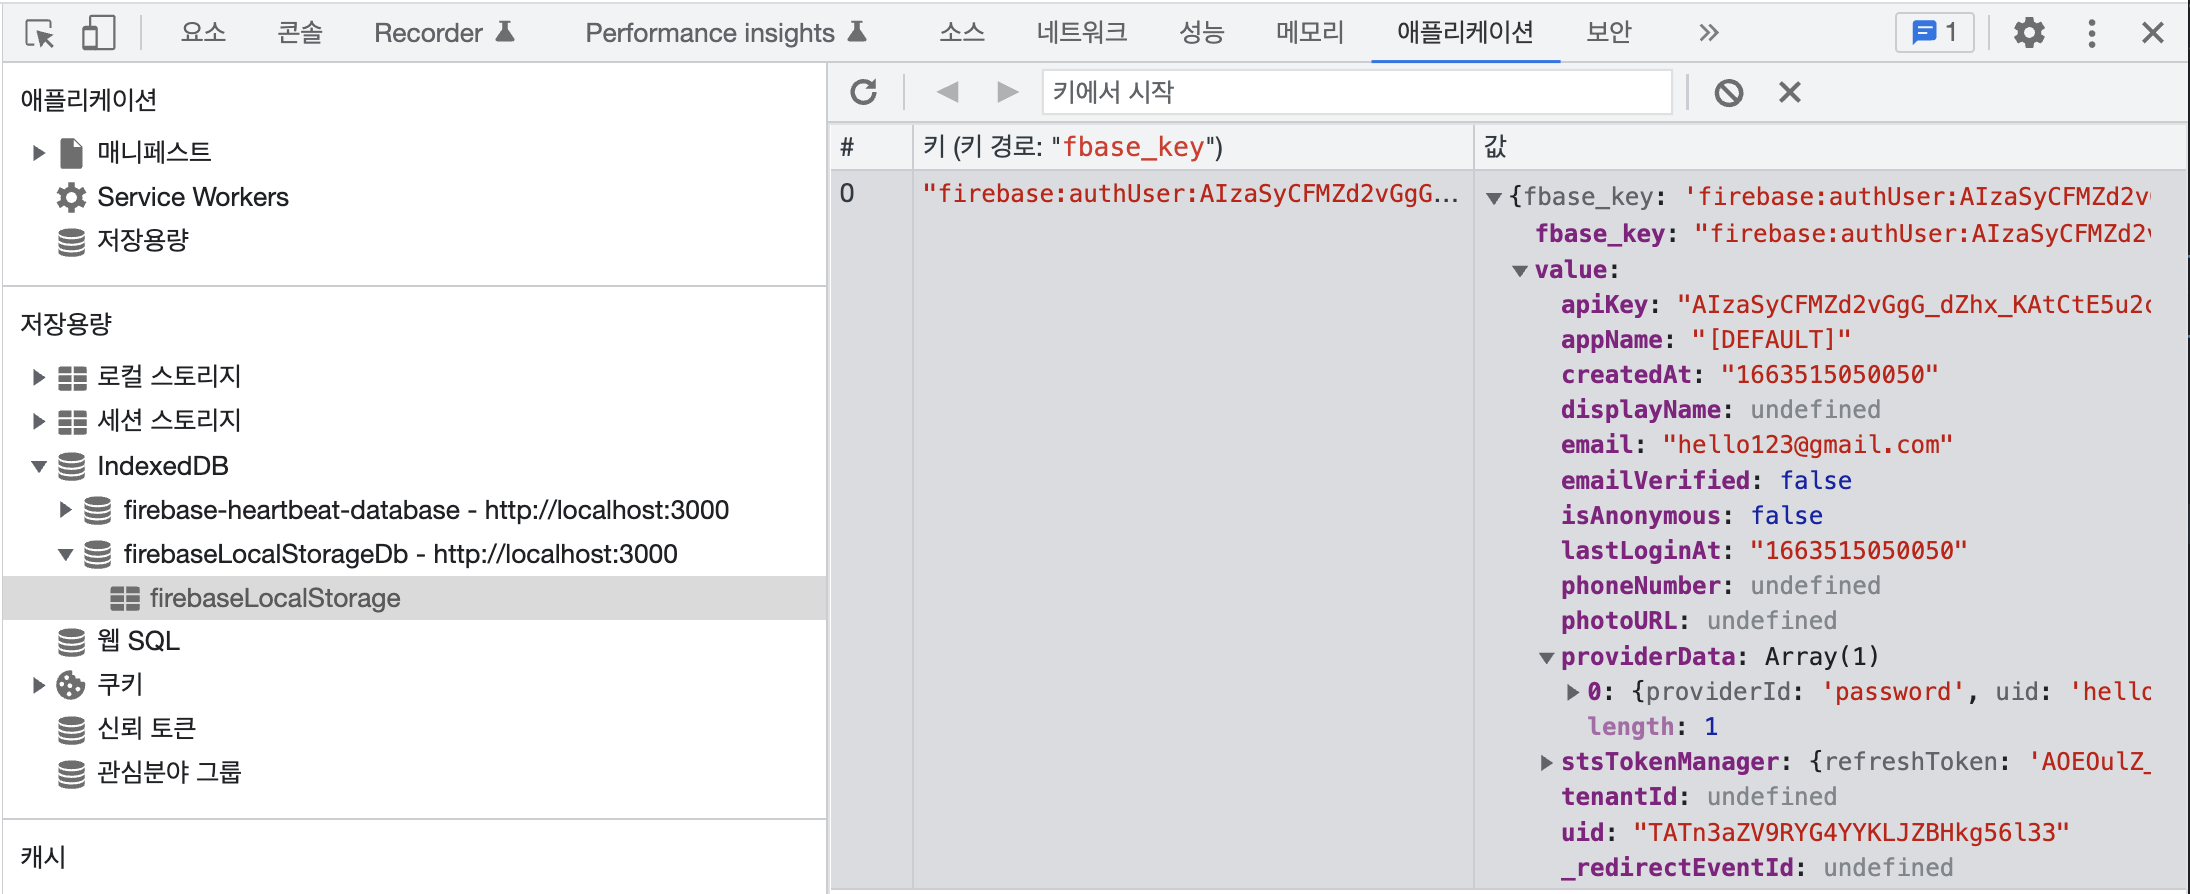
export default Auth;setPersistence
인증 상태 지속성 설정 Firebase - 인증 상태 지속성
firebase.auth().setPersistence메서드를 통해 기존의 지속성 유형 설정할 수 있다.
local(default): 브라우저를 닫더라도 사용자 정보를 기억한다.session: 탭이 열려있는 동안에는 사용자 정보를 기억한다.none: 사용자 정보를 기억하지 않는다. 로그인을 시도할 경우 로그인은 되지만, 새로고침 시 로그아웃된다.
기본적으로 Persistence를 설정하지 않으면 local로 설정된다.
로그인 된 상태에서 개발자도구를 열어 firebase 로컬 스토리지를 확인해보면 접속된 사용자 정보를 그대로 기억하고 있는 것을 확인할 수 있다.
onAuthStateChanged
Firebase Auth - onAuthStateChanged
onAuthStateChanged는 유저 상태의 변화가 있을 때 실행되는 메소드이다.
다음과 같이 활용할 수 있다.
import { authService } from 'fbase';

function Auth() {
  const [isLoggedIn, setIsLoggedIn] = useState(false);

  useEffect(() => {
    authService.onAuthStateChanged((user) => {
      console.log(user);
      if (user) {
        // 로그인 된 상태일 경우
        setIsLoggedIn(true);
      } else {
        // 로그아웃 된 상태일 경우
        setIsLoggedIn(false);
      }
    });
  }, []);

  return <>...</>;
}
소셜 로그인 구현
소셜로그인을 구현할 수 있는 방법은 signInWithRedirect과 signInWithPopup 두가지 옵션이 있다. 이 글에선 팝업 형식으로 구현할 것이다.
signInWithPopup을 사용하려면
- Provider 가 있어야 한다. Provider는 각 소셜에 맞게 사용할 수 있다.
- Google(
GoogleAuthProvider), GitHub(GithubAuthProvider) 등 공식문서 참고
- Google(
- SignWithPopup를 호출한다.
- 첫 번째 인자로 auth를 전달한다.
- 두 번째 인자로 1번에서 생성한 Provider를 전달한다.
다음과 같은 형태로 사용할 수 있다.
import { getAuth, GoogleAuthProvider } from 'firebase/auth';

const auth = getAuth();
const provider = new GoogleAuthProvider();

signInWithPopup(auth, provider)
  .then((result) => {
    const credential = GoogleAuthProvider.credentialFromResult(result);
    // ...
  })
  .catch((error) => {
    const credential = GoogleAuthProvider.credentialFromError(error);
    // ...
  });
다음과 같이 응용할 수 있다.
import { authService } from 'fbase';
import { GoogleAuthProvider, signInWithPopup } from 'firebase/auth';

function Auth() {
  const onSocialClick = async (evt) => {
    const provider = new GoogleAuthProvider();
    const data = await signInWithPopup(authService, provider);
    console.log(data); // 로그인 정보
  };

  return (
    <>
      <button onClick={onSocialClick} name="google">
        Continue with Google
      </button>
    </>
  );
}
로그아웃 signOut()
로그아웃은 signOut 메소드 호출로 간단하게 처리할 수 있다.
import { getAuth, signOut } from 'firebase/auth';

const auth = getAuth();
signOut(auth)
  .then(() => {...}) // logout successful
  .catch((error) => {...}); // logout fail

// 또는
auth.signOut();
다음과 같이 응용할 수 있다.
import { useNavigate } from 'react-router-dom';
import { authService } from '../fbase';

const Profile = () => {
  const navigate = useNavigate();
  const onLogOutClick = () => {
    authService.signOut();
    navigate('/');
  };
  return (
    <>
      <button onClick={onLogOutClick}>Log Out</button>
    </>
  );
};

export default Profile;